Anyone can create skins for Slay.one. The details on how to begin designing your own skin are described below.
 The skin template
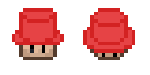
Basic Human Skin
Below is the basic skin template for the head of a slayer.
This is a good starting point to work from if you'd like to add a new hat, hairstyle, or other humanoid design to the game.
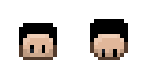
Wolf Skin
Below is the wolf skin template.
If your skin idea is more animal than man, this could be a better starting point.
Be sure to save the file rather than try to copy-paste; it is a transparent file and will have a black background if pasted.
Using the template
Templates like the above are actually slices of real files used to animate the slayers in-game. The use of a template like this is recommended so that the size, shape, and number of angles that you create match up to those in-game. This way it can be easily adopted into the game.
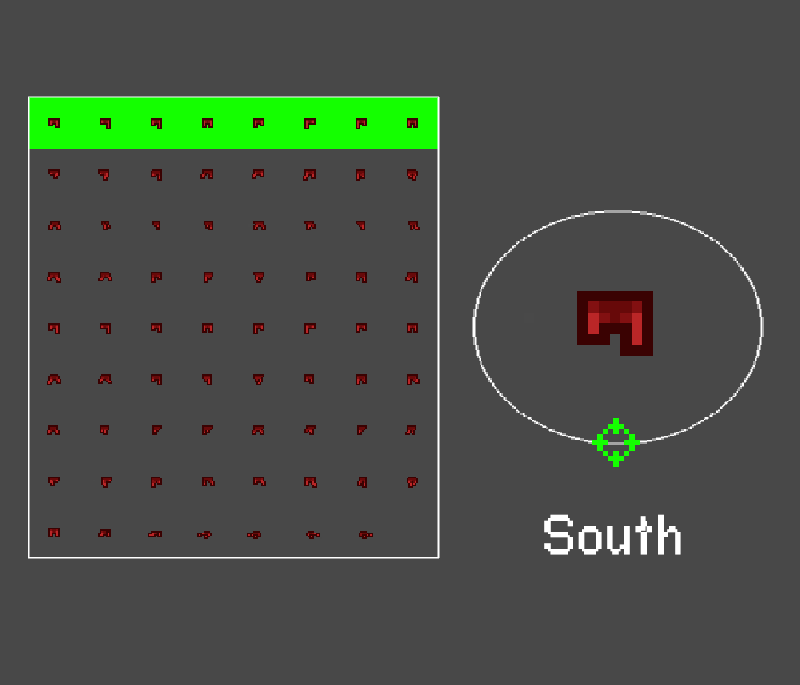
Each skin in Slay.One is broken down into 3 sections: normal, reloading, and dead:
Please note: Do NOT use this image to draw your skin, it is enlarged to show detail. Please use the template above this section with the transparent background.

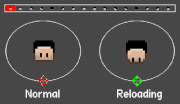
Animation showing how each head corresponds to an angle a cursor points to in-game.
You must draw every one of these angles so the skin looks correct when used.
For the normal and reloading sections, there are eight angles to account for each cardinal direction the user points their cursor towards (see right).
 Skin editing programs
There are a variety of image-editing programs out there at varying difficulty levels and price-points. If you already own and are familiar with a program like Photoshop, you can use that for skin creation.
However, if you are not looking to buy an expensive program just to make skins, there are many free and even browser-based options available that will make skin-making easy and accessible.
Browser-based
Piskel is a free, browser-based application specifically for creating pixel sprites. Account creation is available but not necessary.
Software-based
Paint.net is a free, software-based downloadable program for all types of image editing on Windows machines.
Getting started with Piskel
So you've chosen Piskel as your skin editor: Now what? Here is a step-by-step guide to loading your template into Piskel, creating a new layer, and getting to work making your first skin.
Loading the template into Piskel
- First thing's first:you need to save the template. Decide your template above, right -lick on the image, and save the image as you would normally.
- Next, navigate to Piskel and click Create Sprite. You'll be presented with a canvas space to work on, as well as a toolbar on the left, and your options (such as layers, transformations, your color pallet, and the load/save icons) on the right.
- Click the load icon on the right middle of the screen. In the drawer that opens, select the IMPORT FROM PICTURE option.
- This will bring up your file picker, where you can then navigate to and open the file you saved in step 1.
- On the Import and Merge box, simply say import without changing any options. This will put the template in the correct size.
- The template should now show up in your Canvas, ready to edit!
Template-editing tips
Creating layers
A layer is one of your most important tools as a digital artist. It allows you to separate your image into multiple 'pages', which can be edited independently. This means that you can have the template on one layer, your alterations on another, and if you decide to erase or change colors on your alteration, it will not delete or affect the template. It's a life-saver.
When you imported your template into Piskel, it was automatically placed on Layer 1, which you can see in the Layers tab on the right side of the screen. If you'd like, you can rename this layer to 'template' by clicking the pencil icon in the Layers tab.
To make a new layer, press the "+” button on the Layers tab. It will name the layer as Layer then a number, which you can rename to be more descriptive if you wish. Once you make a new layer, it becomes the active (selected) layer, which you can tell by the yellow color of the layer name. You can switch which layer you are editing by clicking on a different layer. To delete a layer, press the X button on the layer tab.
Now, if you make edits to Layer 2, Layer 1 (the layer the template is on) will not be altered.
You can have as many layers as you want, one for skin, one for hair, one for hat, one for shadows, one for highlights, go crazy!
Fitting your skin to the game
You can create the most fabulous skin imaginable, but if it doesn't look right in the game, we'll all be sad. Your design must look like it belongs in the game, just like any current skin.
To do this, try your best to use existing colors from the game, make sure the size of the skin fits onto the template, and consider the isometric design of the game.
Slay.one's linear nature
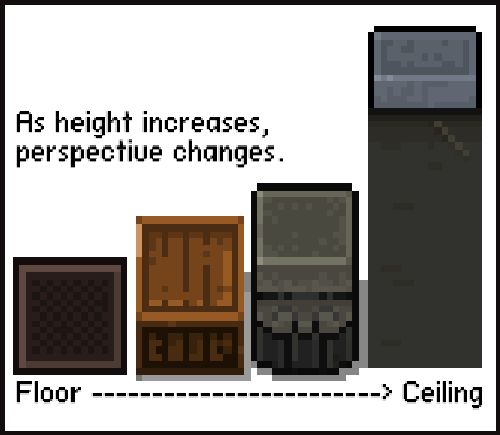
An example of how the height of an object in-game effects how it is drawn.
Isometric art is art that is drawn at 3-D “three-quarter” perspective. Slay is similar to this perspective, but viewed from a single point, referred to as“top down linear” perspective, rather than 3-D. This means that when you are playing the game, you are looking at it from above.
Please see the animation on the right that demonstrates this, and how the height of an object relates to how it is drawn.
To learn more, see this guide on linear perspective. Keep in mind when reading that slay's vanishing point is largely lower due to the high "camera" angle.
Tutorial: Applying linear perspective to skin design
This is a vital topic to understand before starting your skin.
When you are making your skin, be sure that it also follows the isometric angle. When you place the eyes, be aware you are looking down on the head in the normal section, and looking very down on it in the reloading. It should not look like a face you are eye-level with, but slightly above.
Below is an example of a common mistake seen when making a skin, and how to correct it.
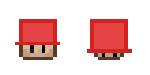
This slayer has a very nice red top hat, but it doesn't look quite right. This is because, although the slayer is drawn at a top-down perspective, the hat is not.
They do not go together.
Here is what we will convert it to.
Firstly, we have two regular template heads, one looking forward normally and one looking forward while reloading. Notice how they both look down, the reloading one even more than the normal.

Let's break these heads down into boxes, like in the animation to the right. This makes it easier to visualize the perspective.
Now we can see the top of the head, from what is the front side. Notice how as the head looks more down to reload, the top of the head becomes more visible, while the face is less.


Using this top square, we can draw some circles/ovals that will create the top and bottom of the hat. They should be the same angle as the top of the head.

Now we can fill in the hat to look whole. When we switch back to the regular template head, it looks good.
Comparing the two versions, it is clear that the one made using the perspective of the template seems to fit him better!
This concept can be applied to anything you draw on your skin: Hats, hair, beards, crowns, animal ears, bows, everything should fit the slayer at the right perspective.
Additional Skin-making Tips
Getting more detailed: Legs
Technically, the part of the skin that the template covers is only the head of the skin. There are also legs that are used to complete the look.

Click above for an animated example of how to use the leg template.
These legs are not necessary to make, there are many leg colors already available in the game to suit most skins. However, if you have a completely different leg idea, they can be customized and sent in with your head file.

leg template
For the incredibly motivated and those with a unique leg design, a template for the leg angles are above.
Please see the animated graphic to the right in order to understand how the leg template is ordered.
Submitting your skin
It's recommended that skin designs are posted to the slay.one Discord or Subreddit for critique by other users before submission, to ensure your skin is as good as can be.
When you post your skin for critiques, please try to post a larger size image, so people can view the skin without zooming in or loading it into a program.
Currently, all skin submissions are closed! Check the discord announcements and keep an eye here, detailed instructions on how to submit will be available when they reopen.